


How to Use a Meat Thermometer – My Experience Using the ThermoMonster Instant Read Thermometer
How to Use a Meat Thermometer – My Experience Using the ThermoMonster Instant Read Thermometer
If you cook meat regularly, learning how to use a meat thermometer can completely change your results in the kitchen. I used to rely on guesswork when cooking steak, chicken, or BBQ. Sometimes the meat looked done on the outside but was still undercooked inside, and other times I overcooked it and ended up with dry meat.
A few weeks ago, I decided to try the ThermoMonster 0.5-Second Instant Read Digital Meat Thermometer, and it quickly became one of the most useful tools in my kitchen. After using it for several weeks, I realized not only how simple it is to use a meat thermometer but also how much it improves cooking results.
Let me walk you through how to use a meat thermometer properly while sharing my personal experience using the ThermoMonster model.
Why Learning How to Use a Meat Thermometer Matters
Many home cooks still rely on color, cooking time, or cutting meat open to see if it’s done. The problem is that these methods are not reliable. The only accurate way to know if meat is safely cooked is by measuring its internal temperature with a thermometer.
Using a thermometer ensures the meat reaches the proper internal temperature and prevents both undercooking and overcooking. Once I started using one regularly, I noticed my food became much more consistent.
This is where the ThermoMonster digital thermometer made a huge difference for me.
My First Impressions of the ThermoMonster Thermometer
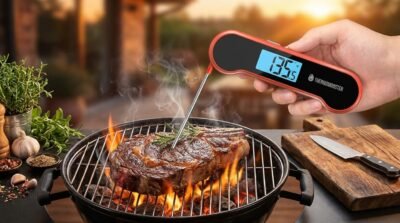
When I first opened the ThermoMonster thermometer, I liked how compact and sturdy it felt. The bright red design makes it easy to spot in the kitchen drawer, and the folding probe keeps it safe and easy to store.
The probe itself is about 4 inches long, which is perfect for checking thick cuts of meat while keeping your hand away from heat. I mainly cook steak, chicken, and grilled burgers, so this length works well for my needs.
Another thing that stood out immediately was the large LCD display, which is bright and easy to read.
How to Use a Meat Thermometer (Step-by-Step)
After using this thermometer many times, the process became extremely simple. If you’re new to cooking with a thermometer, here’s the method I follow.
First, insert the probe into the thickest part of the meat. This is important because thinner areas cook faster and can give inaccurate readings.
Second, make sure the probe does not touch bone or fat, because those areas can produce incorrect temperature readings.
Third, wait for the temperature reading to stabilize. With the ThermoMonster thermometer, this is incredibly fast because it gives a reading in about 0.5 seconds. That speed really impressed me compared to slower thermometers I’ve used before.
Finally, check the displayed temperature and compare it with the recommended internal temperature for the type of meat you are cooking.
Once I started following this process, cooking meat became much easier.
Cooking with the ThermoMonster Thermometer
Over the past few weeks, I used the ThermoMonster thermometer in many cooking situations.
For grilling steaks, I simply insert the probe into the center of the meat and instantly know whether it has reached my preferred doneness. Instead of guessing or cutting into the steak, I can quickly check the temperature and remove it from the grill at the perfect moment.
When cooking chicken in the oven, the thermometer helped me ensure the meat was fully cooked without drying it out. I just insert the probe into the thickest part of the breast and check the temperature before removing it from the oven.
I also tried it while making caramel and frying food, and it worked perfectly for those situations too.
Features That Made the ThermoMonster Stand Out
After using this thermometer for several weeks, a few features really stood out to me.
The 0.5-second instant reading is easily the most impressive feature. I don’t have to hold the probe inside the meat for several seconds waiting for the number to stabilize.
The temperature lock function is also useful when grilling. I can lock the temperature reading and step away from the heat before checking the display.
Another feature I like is the auto-flip LCD screen, which rotates depending on how you hold the thermometer. Whether I’m using my left or right hand, the screen always faces the correct direction.
Cleaning is also easy because the thermometer has a 100% waterproof design, so I can rinse it under running water after cooking.
Small Things I Noticed
After using the ThermoMonster thermometer regularly, I didn’t encounter many problems. The only thing to remember is that this type of thermometer is designed for quick temperature checks, not for leaving inside the oven during cooking.
Other than that, it performed exactly as I expected.
Final Thoughts
Learning how to use a meat thermometer is one of the best things any home cook can do to improve their cooking. It removes the guesswork and helps you cook meat safely and perfectly every time.
After several weeks of using the ThermoMonster 0.5-Second Instant Read Meat Thermometer, I can honestly say it has become one of my favorite kitchen gadgets. It’s fast, accurate, easy to clean, and extremely simple to use.
If you cook meat regularly—whether it’s BBQ, grilled steak, roasted chicken, or even candy making—having a reliable thermometer like this can make a huge difference in your results.
And once you get used to using one, you’ll probably never want to cook meat without it again.


One thought on “How to Use a Meat Thermometer – My Experience Using the ThermoMonster Instant Read Thermometer”